1. Incorrect File Format
One of the most frequent mistakes customers make is submitting files in the wrong format. Print shops typically require vector files (like AI, EPS, or PDF) for logos and illustrations because they can be scaled without losing quality. However, many customers mistakenly send raster files (such as JPG, PNG, or GIF), which may not provide the resolution needed for high-quality printing, especially if resizing is required.
How to Avoid: Always check with your printer to confirm the required file format. If you’re working with a designer, ensure they deliver the final artwork in the correct format. If you’re unsure, vector files are generally a safe bet for logos and other graphic elements.
2. Low-Resolution Images
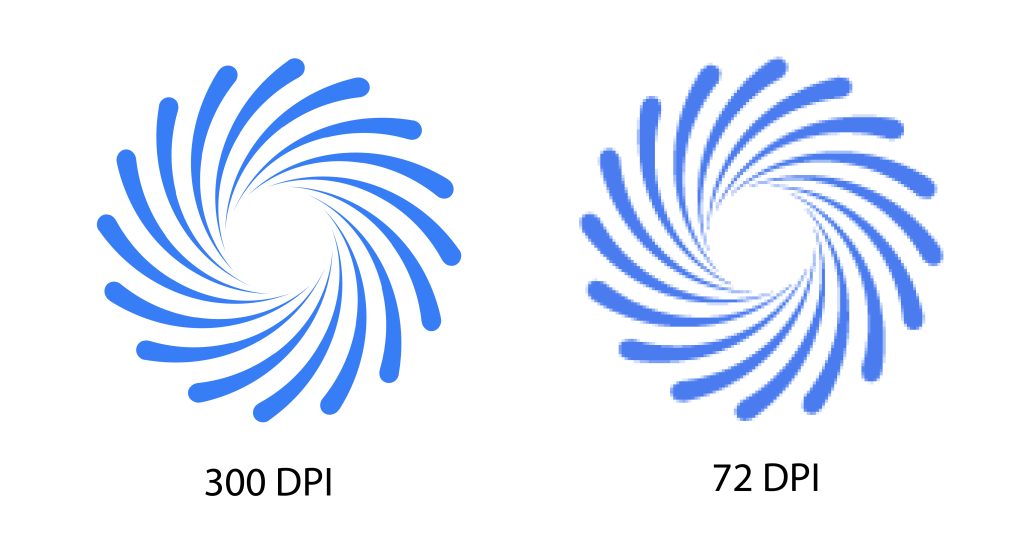
Resolution is key to ensuring that your printed materials look sharp and professional. A common mistake is using low-resolution images, which can result in pixelated and blurry prints. The standard resolution for print is 300 dots per inch (DPI). Anything lower than that might look acceptable on a screen but will likely disappoint in print.

How to Avoid: Before sending your files to the printer, make sure all images are at least 300 DPI. If you’re using stock images, select the highest resolution available. If you’re scanning images, set the resolution to 300 DPI or higher.
3. Missing Bleed and Crop Marks
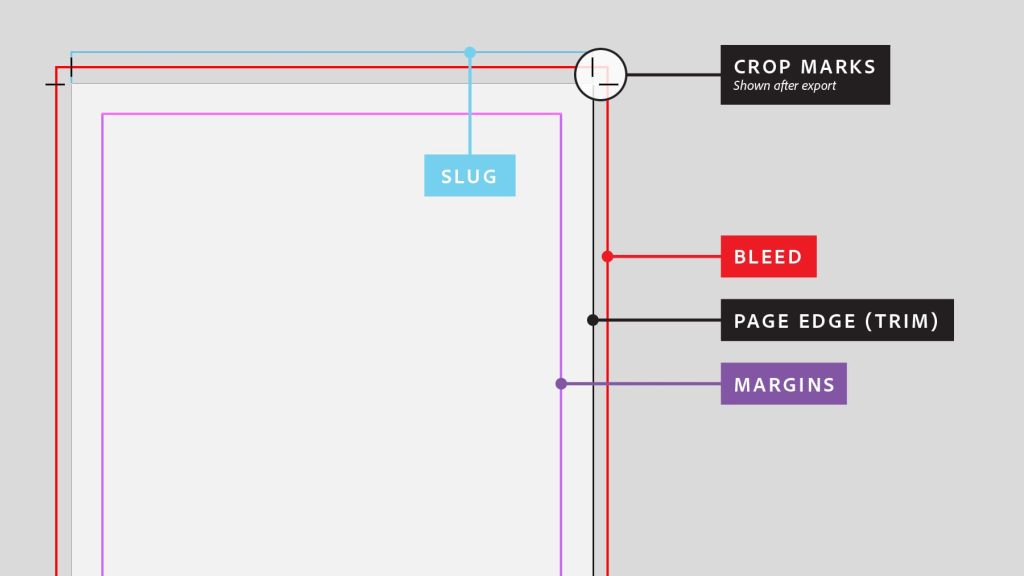
Bleed is the extra space around your design that allows the printer to trim the document to the correct size without leaving any white borders. Crop marks indicate where the paper should be cut. Many customers overlook adding bleed and crop marks to their designs, leading to unintentional white edges on the final product.
How to Avoid: Always include a bleed of at least 0.125 inches (3mm) on all sides of your design. Make sure crop marks are also included to guide the printer on where to trim the document.
4. Using RGB Instead of CMYK
RGB (Red, Green, Blue) is the color model used for digital screens, while CMYK (Cyan, Magenta, Yellow, Black) is the color model used for printing. Submitting files in RGB mode can result in unexpected color shifts when printed, as the colors on screen won’t match the printed output.
How to Avoid: Always convert your files to CMYK before sending them to the printer. Most design software, like Adobe Illustrator or Photoshop, allows you to switch between color modes easily. By working in CMYK, you’ll have a more accurate preview of how your colors will appear in print.
5. Embedded Fonts and Text Issues
If the fonts used in your design aren’t embedded or converted to outlines, they may not display correctly on the printer’s system, leading to unwanted font substitutions or missing text.
How to Avoid: Convert all text to outlines or curves before sending the file. This ensures that the text will appear exactly as intended, regardless of the fonts installed on the printer’s system. If your file is a PDF, double-check that all fonts are embedded.
6. Inconsistent Color Profiles
Different devices and software use different color profiles, which can lead to color inconsistencies in your printed materials. This is especially problematic if you’re using multiple design tools or collaborating with others.
How to Avoid: Stick to one color profile (preferably CMYK) throughout your design process. When working with images, ensure they all share the same profile. Many design programs allow you to embed a color profile in your file, which can help maintain color consistency.
7. Ignoring Safe Zone Guidelines
The safe zone refers to the area within your design where all important elements (like text and logos) should be placed to avoid being cut off during trimming. Customers often place text or important graphics too close to the edge, risking them being trimmed off in the final print.
How to Avoid: Keep all essential elements within the safe zone, typically 0.25 inches (6mm) from the edge of the document. This will ensure that nothing important is lost during trimming.
8. Failing to Proofread
It may sound obvious, but spelling and grammar errors are surprisingly common in print-ready files. Once the file is printed, it’s too late to make corrections, which can lead to reprints and additional costs.
How to Avoid: Always proofread your work thoroughly before submitting it for print. It’s also a good idea to have someone else review your file, as a fresh pair of eyes can catch mistakes you might have missed.
9. Not Allowing for Margins and Spacing
Relying solely on digital proofs can be risky, as colors and details may look different on screen compared to the final print. A hard copy proof can help you catch errors or discrepancies that might not be obvious on a monitor.
Relying solely on digital proofs can be risky, as colors and details may look different on screen compared to the final print. A hard copy proof can help you catch errors or discrepancies that might not be obvious on a monitor.
Creating print-ready art files involves a series of detailed steps, and overlooking even a small aspect can lead to costly mistakes. By understanding and avoiding these common errors, you can ensure that your printed materials come out exactly as you envisioned, saving both time and money. However, it’s just as important to choose a commercial printer that acts as your trusted print advisor. Here at STiCKi, we work with our customers through each phase to ensure their print turns out even better than they expected. Our goal is to guide you through the process, helping you achieve the highest quality results every time.


